Blog Archives
Permaculture Yard Conversion Project Journal #1: The Design Process
A good friend of mine recently presented me with the opportunity to redesign her suburban home’s landscape using permaculture design. I am, of course, very excited about this project and would love to share the process via this project journal. I will be using this journal to document this yard conversion from start to finish, as well as to give my readers a chance to see what goes into creating and implementing a permaculture design on a suburban lot scale. This suburban home is located in San Diego, California, near San Diego State University. The home was built in 1927, and has been owned by my friend, Melissa, for the last 15 years. At the start of this project she expressed her primary motivations for doing the yard conversion: The current yard is a former lawn which has been destroyed by her five (yes five) dogs and is now covered in weeds. The lawn/weeds requires too much water to keep green in the summer time, especially with water rates rising recently, so she would like to replace it with a low water usage/drought tolerant landscape that is easy to maintain and can withstand abuse from her dogs. She likes the idea of having fruit trees and edibles in the landscape, but is not interested in intensive gardening. She would also love to have a nice comfortable space to entertain in what is now a very hot back yard. With these motivations as a guide, I am hoping to design and install a landscape that is pleasing to the senses, harvests much of its own water requiring little extra irrigation, is very easy to maintain, and will provide some food crops well into the future.
Day 1 3/10/2015
Today I met with the client, Melissa, for the initial client interview and walk through of the site. The site is a suburban home and lot in San Diego, California which she owns but has recently moved out of, leaving her two sons and a male tenant to occupy. I had previously sent a client questionnaire which was filled out by Melissa to gauge her initial interest and intentions. Today we built upon that questionnaire and got some more detailed information regarding the site and the goals for the project. We also answered some key questions about the ethics guiding the project, the roles of the people involved, how the design and implementation process will progress, the budget, the expected time frame, and the end point of involvement for me and my team. This information will go into a memorandum of understanding which will be signed by all parties and help to reduce or eliminate any misunderstandings, and create clear expectations. These questions, many of the client interview questions, and the whole design process over all is being guided by the book Permaculture Design: A Step-by-Step Guide by Aranya, which I have found to be a very practical and easy to use reference book to have on hand during the entire design and implementation process.


Day 2 3/11/2015
Today I met with my design partner, Carol-Anne Besler, who’s roles in this project are assistant, design apprentice, laborer, and personal partner. We met at a coffee shop to try to make sense of the mountain of work that is now ahead of us. There is a lot of different elements to this project, and many things that need to be accomplished, so it was a bit daunting to look at it all at once. To help break the work down into manageable chunks, we started by drawing out a web of the different elements of the project, and the requirements of those elements: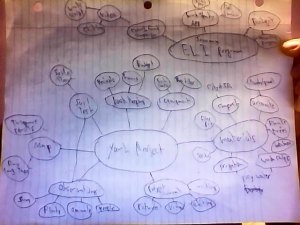
This was a very effective way to help us see the individual tasks that needed to be accomplished so that we could then create a to-do list, and start to decide what needs to be done first. We also talked about what out individual roles would be, and who’s skills would naturally be fitted to each task. We stepped away from this meeting with a much better idea of what we need to do to get started, and how we can move the project forward.
Day 3 3/12/2015
Today was the first real work day, in which we started to clear away some of the existing over-grown plant material on site. This was done to allow easier access to the site for mapping, and provide a more clear view of the base point from which we are starting. Carol-Anne cleared away all of the weeds in the back yard, mostly common mallow, while I pruned the existing lemon tree. There was quite a lot of pruning to be done as the lemon tree has not been pruned in at least the last 15 years in which Melissa has owned this home. The interior of the tree was tangled with suckers and not much light was penetrating. Now that the tree is pruned that corner of the yard is receiving much more light, so this new pattern may be considered during the design process.
Day 4 3/13/2015
Today we created a base map of the property, consisting of the boundaries and major elements currently existing on the project. To start out we used a 100 foot tape measure to record the size and relative location of each building, the pool, and the hardscape areas. This was accomplished using the base line method described in the permaculture design handbook mentioned earlier. Each important point, like a corner of the pool, was measured from two separate points on a fixed baseline, such as the front curb or the south side fence. These measurements are used to triangulate the position of each important point. All of the measurements were written down on a rough sketch in the field, and then used to create a scale map on a drafting board. Meanwhile, Carol-Anne created an inventory of the materials already available on site, and did some research to identify the existing plants as well as other plants and fruit trees that might be suited to the site.
Day 6 3/15/2015
Today I turned on the existing irrigation system to map out which zones were controlled by each valve. There is a system of valves in the backyard near the hose bib and water heater, as well as a system of valves in the front near the hose bib and water filter. In the back yard, I was unable to locate the sprinklers for the first valve, although I could hear water running. This likely means there is a break in the line somewhere underground, but I could not see wet ground anywhere. The other zones were easy to locate, as each valve controls the sprinklers along a different edge of the pool. By elimination, I believe the first valve is supposed to control sprinklers along the south side of the house. In the front yard I found that 2 out of 3 irrigation zones are broken underground, so I can not identify where they go. The existing sprinklers are arranged around the edge of the lawn and are the spray type. It is quite likely that I will be removing most of the existing irrigation system, front and back yard, and replacing it with a simple drip system to help with establishment of the new plants. Once the landscape is established and well rooted, I am hoping that the water harvesting features of the design with prevent the need for further irrigation.
Day 7 3/16/2015
Much of today was spent drafting and creating layer maps for the design. I started out by creating a sun sector map, showing the minimum and maximum extent of the sun rise and set points through the solstices. The lot is positioned almost directly along an east west axis, so the yard receives much sunlight throughout the entire year. The only shadowed area is along the driveway on the north side of the house, but this area is already well planted and we will likely just be filling in with some nasturtium seeds. I then created a map of the projected water flows through the site. The entire roof of the house drains at one point along the west wall into the back yard, which makes water harvesting very simple. It is interesting to note that this house was built in 1927, while most of the other houses in this neighborhood were built in the 50s and 60s. All of the surrounding houses have roofs that slope outwards, shedding water off the side, while this house has a roof that collects water at the center. It seems that in 1927 the designers of this house still realized that San Diego is in a desert environment and that water is a resource that should be collected. By the 1950s builders and designers had started to ignore this reality and build houses that repelled water.

In my design I plan to utilize the water hat is collected and concentrated by the roof, by directing it into level infiltration basins where it can soak into the ground and be stored for the use of the plants in the landscape. I separated the back yard into different “watersheds” or zones, one on either side of the pool and a third in the back of the yard. The water from the house roof will drain into the south side of the pool, while the water from the garage and shed roofs will drain into the north side of the pool. Both of these basins will overflow into the third basin at the back of the yard. In the event that this third basin fills completely, it will overflow out of the back of the  property and into the easement, where the water is currently leaving the property via an existing French drain. It would take a very large rain event for all three basins to fill and overflow, but an event like this must be accounted and designed for.
While I was drafting, Carol-Anne was pruning more of the existing plants and succulents, including a large amount of woody material from a tree that was growing up between the sheds and the north fence and covering much of the shed and garage roofs. It appears this tree was cut down when the shed was installed but has grown back from the stump, so it will likely need to be cut back yearly to prevent it from damaging the sheds. There was a lot of leafy material that had collected on the garage and shed roof from this tree that will be useful as composting material.
Day 10 3/19/2015
Today I did a bit more drafting  and design work, mainly creating a map of the hardscape and structures that will be installed. Most of the back yard will be covered with a semi-hardscape made of broken up concrete chunks, aka “urbanite,” with approximately 6 inch gaps between the blocks where a groundcover will be grown. This will provide an easy to maintain surface that will prevent the dogs from digging, while also allowing water to soak through. A layer of gravel will be laid down beneath the urbanite to prevent them from sinking and allow them to be leveled, while the gaps between the concrete will be filled with a mixture of compost and the existing soil to provide a well drained growing medium for the ground cover. The layer of gravel will also provide a zone for water to collect without pooling above ground, it can then soak into the hard clay sub-soil of the site. The hardscaped area will surround the pool, providing and easy walking path to the back of the yard, while two raised beds will be built along the edges of these paths. The plants and trees in these beds will benefit from the water collected in the paths. In the north west corner of the yard, in front of the sheds will be a slightly raise area that will serve as an additional rain water harvesting surface as well as a fire pit and entertainment area. This will utilize the same urbanite block hardscape, but the gaps will be filled with compacted decomposed granite to allow the water to run across the surface and into an infiltration basin and planter along the west fence.
I will be building a large wooden “pergola” over the back patio to provide shade to this often too hot area. It will be grown over with vines that will provide great shade in the summertime, as well as food and a beautiful environment.
 I also created a map of the new irrigation systems. They will be quite simple, consisting of short runs of underground pvc piping leading to irrigation boxes in the planters, which will connect to drip lines. I am attempting to keep materials costs as low as possible, so the irrigation system reflects this. The irrigation is primarily meant to help get the landscape established, and hopefully wont be used much in the long term. I am installing a grey water system connected to the laundry washing machine that will provide long term irrigation to the plants and trees that need it. Grey water is a huge source of water that is currently being wasted in most households. In California, a simple laundry grey water system can be built without a permit. I looked into the crawlspace beneath the house and saw that it would be possible to collect grey water from the showers and sinks in the house. However, at this time in California a permit is required to install this type of grey water system. A plumbing contractor would have to be hired to re-pipe the drains under the house, and pull the proper permits from the city, along with the accompanying inspection process. These factors put a household grey water system out of the existing budget for this project. One possibility for harvesting the grey water from showers is to simply build a new shower outside that drains into the landscape. This would not require a permit, or a complicated grey water delivery system. I will be discussing this option with the client at the first design proposal.
Day 11 3/20/2015
Today I finished up the drafting and design work. I started by creating a plants and trees layer map over the hardscape map from yesterday. In the back yard, the main plant features will be an avocado tree in the southwest corner, along with two trees in the planter along the south fence. The avocado tree will be watered via the laundry grey water system, and will provide shade for the dogs to rest in as well as a great source of food for decades to come. The two trees along the fence will provide shade over the pool, preventing excess evaporation. They may also be fruit trees, but must be relatively drought tolerant. In the planter beneath these trees we will be planting native flowering shrubs and bushes, as well as small succulents around the borders to provide a nice looking edge.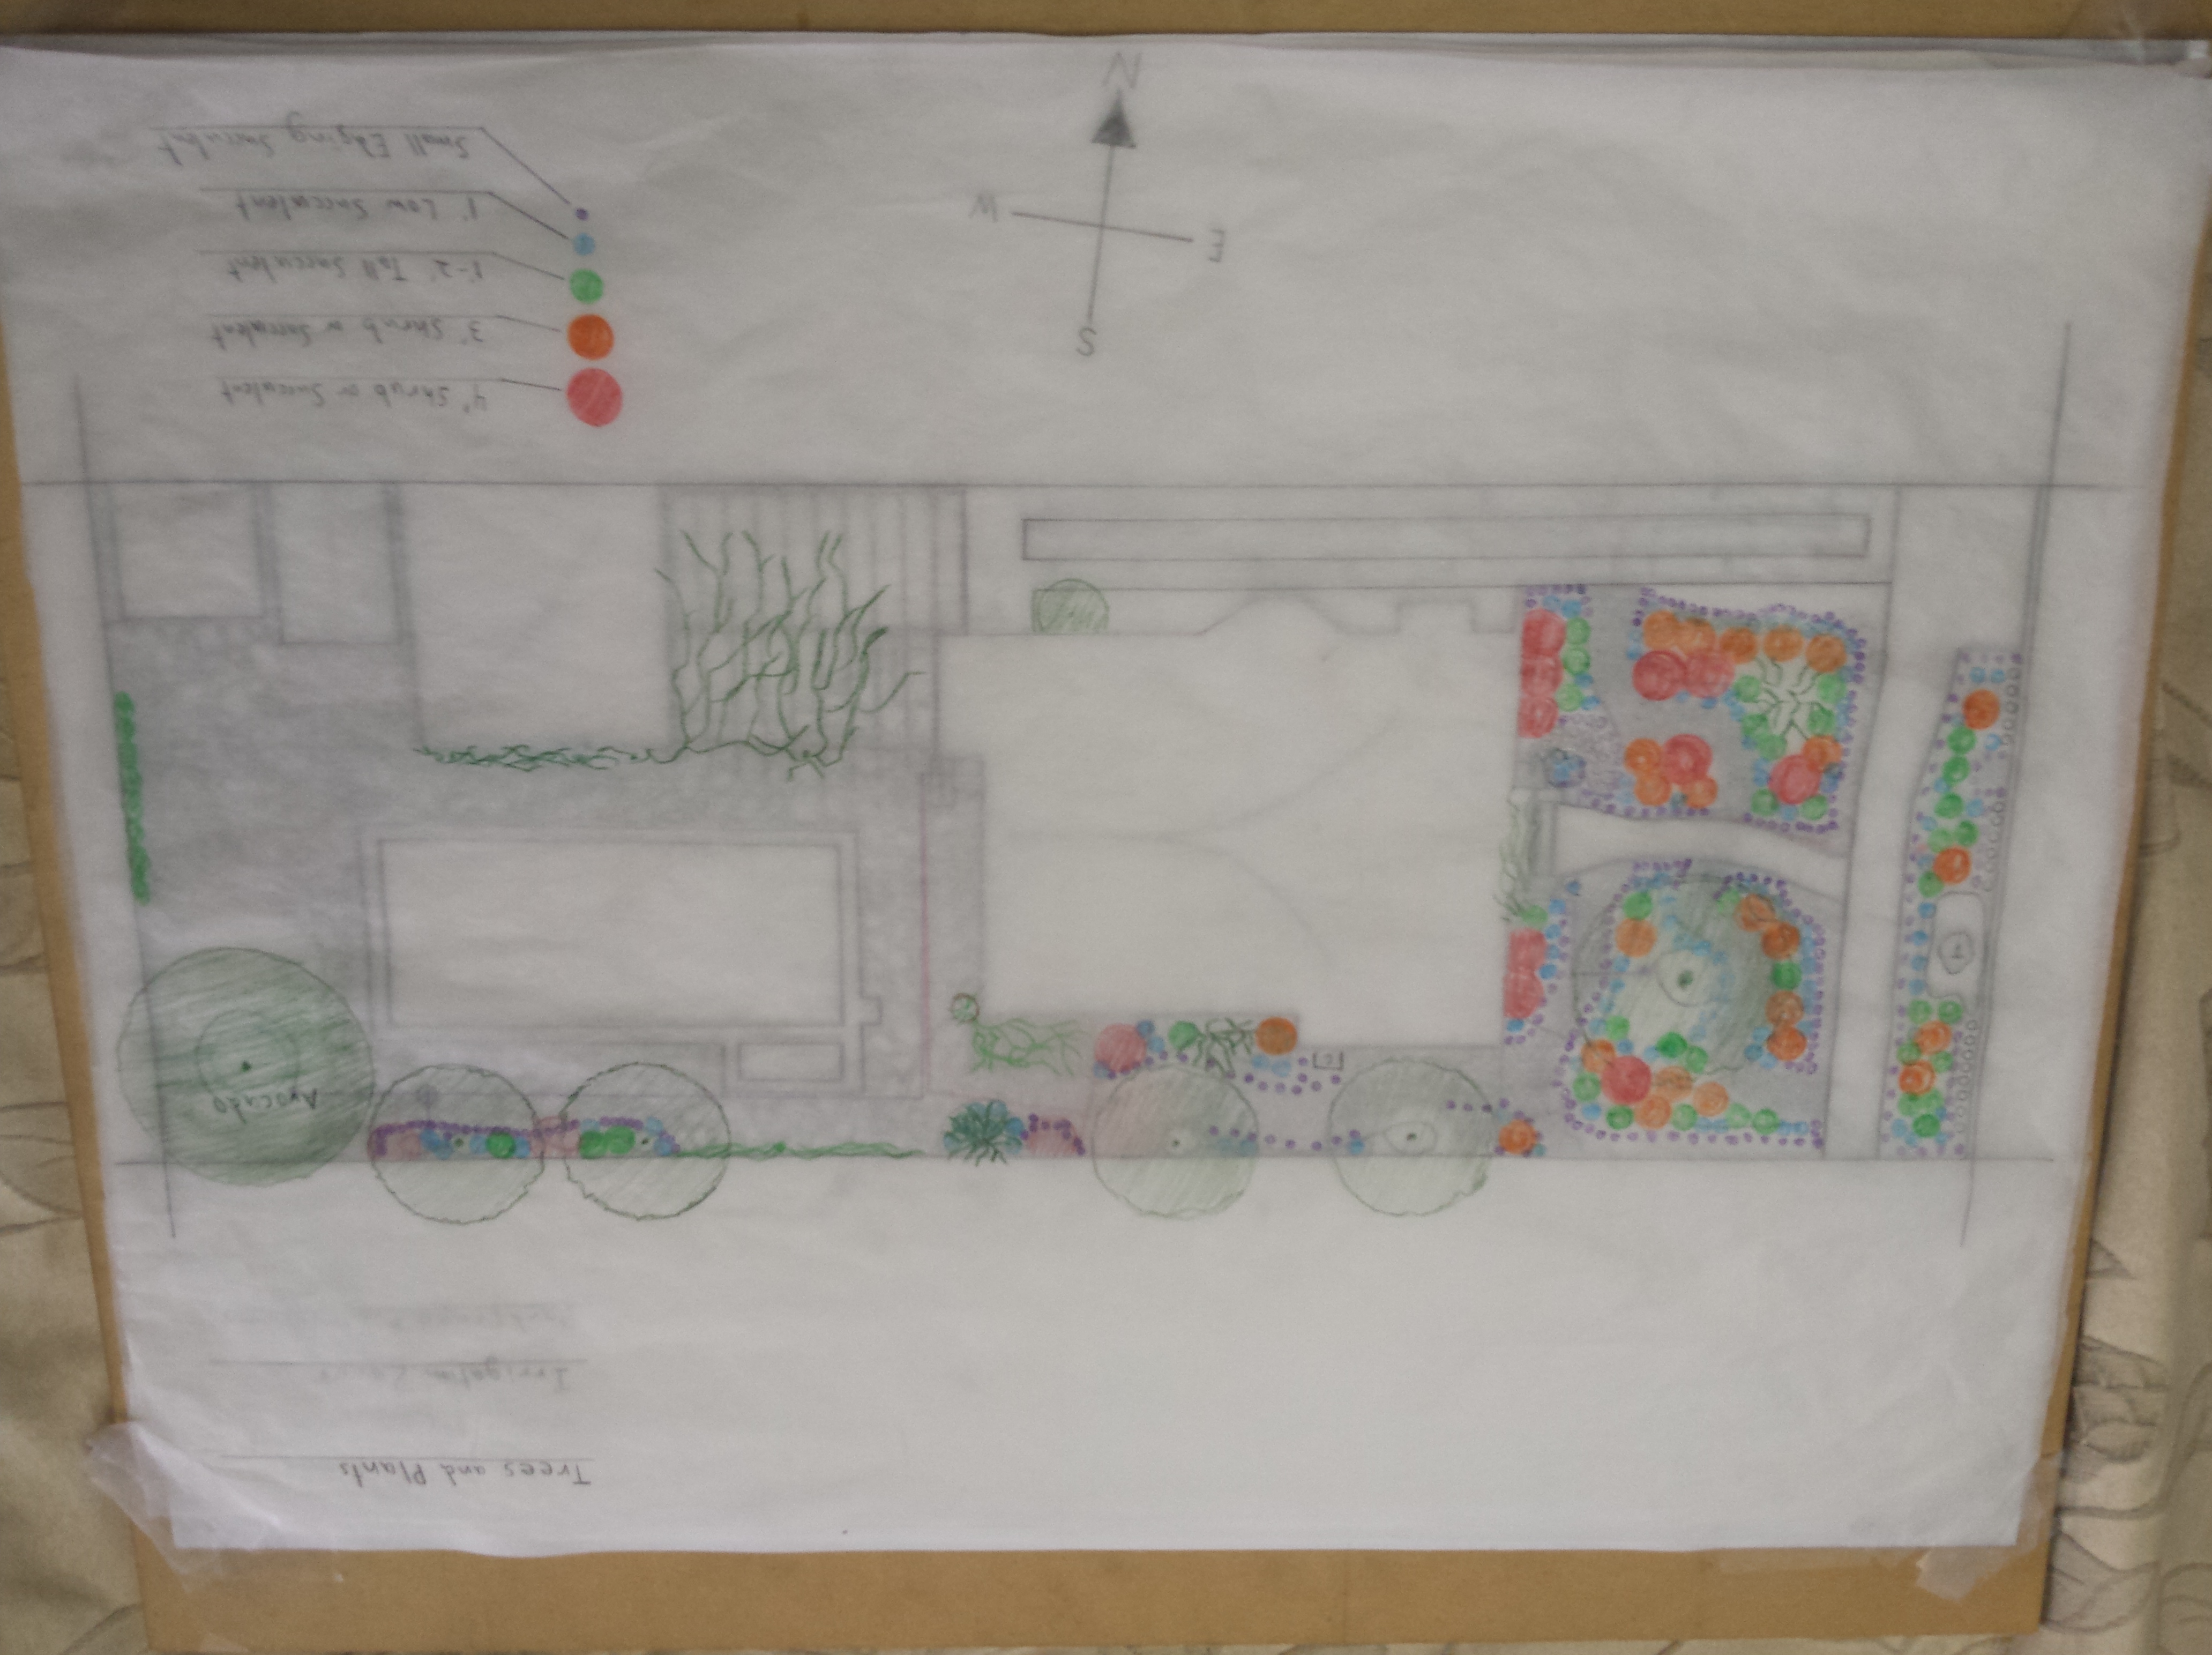
On the side yard to the south of the house we will be planting another fruit tree beside the existing lemon. Beneath these trees will be planted small “guilds” of plants that will help provide nutrients to the fruit trees. The rest of the area which is currently occupied by large Pitaya cacti and other succulents will be filled in with more drought tolerant succulents and the existing rock mulch will be extended. A meandering path will be created down the center of this area using the hexagonal tiles already on site.
The front yard presented some design challenges, mostly because there appeared to be no source of rain water for catchment as the entire house roof drains into the back yard. I was almost settled on simply irrigating the landscape, but then I realized that the driveway could be altered to provide at least some water catchment during rain events. We will slightly dig out the strip of decomposed granite in the center of the driveway so that it drains to one point near the northeast corner of the house. The drain will go under the concrete strip and into a “dry creek” infiltration basin that will snake across the front yard. The existing expansion cracks in the driveway will be cut so that they angle towards the center strip, allowing water falling on the driveway to drain into the center, and then into the dry creek. This catchment may not be as efficient as a roof surface, but it will at least provide some water to the front, instead of allowing that water to soak into the center strip where it wont be useful, or drain off the front of the driveway and into the street.
The dry creek will be lined with stones and provided a nice visual element to design the landscape around. The centerpiece of the front yard will be a 15 to 20 foot tall drought tolerant fruit tree that will be planted on the south section of the yard. We are looking at the Arbutus unedo or “Strawberry Tree” as a good option for this feature, as it is relatively drought tolerant, quite beautiful, and provides an abundant yield of fruit. On the north side of the yard we will re-plant some of the taller Pitaya cactus columns that we cut from the back yard. We will plant a few of these columns together to produce the look of a mature Pitaya cactus. These cacti also provide a yield of beautiful night blooming flowers as well as fruit. Around these two main features will be planted a mixture of drought tolerant native flowering bushes, transplanted bunch grasses from the driveway, and succulents of varying sizes. We will be creating the look of a textured landscape by choosing plants with a variety of mature sizes, and arranging them accordingly. We will also be paying attention to the blooming times of the various plants to ensure that there is always some color in the landscape, as well as a year round supply of pollen and nectar for bees, butterflies, and other native pollinators.
The “green strip” between the sidewalk and street curb will be filled in with drought tolerant succulents and a rock mulch to provide a beautiful and very low maintenance landscape. The entire front yard landscape, once established, should be very water efficient as well as low maintenance, requiring only annual pruning to prevent the bushes from becoming over grown.
Day 13 3/22/2015
Today was the first or “rough draft” design proposal. I used a window in the living room as a light box, taping the layered design drawings onto the window so they could all be easily seen together. I explained the features of the design to the client, Melissa, going over the water catchment features, the hardscape and structures, and the arrangement of the plants. She was very pleased with the design and is excited about having a beautiful new yard. We talked about the possible plants that could be used in the design, and I was happy to hear that she would like to use fruit trees wherever possible. We also talked about the outdoor shower and decided it would be a good addition to the design. Thankfully, there won’t need to be any major changes to the overall design, so we can now move o to the implementation process. I will now be moving from patterns into details, deciding which plants will be used and making lists of materials that will need to be gathered or purchased. From these lists, I will be able to produce a more accurate estimate of costs for the project, which at this point I am still projecting to be well within our budget, as most of the materials will be recycled from waste streams and therefore free.
